
| Rustic Glam Snowflake Wishes Card |
INSTRUCTIONS: |
| Rustic Glam Snowflake Wishes Card |
INSTRUCTIONS: |

I’m sure you’ve seen the Nothing’s Better Than Stamp Set and the Love You More Than Dies, but did you know they’re available at a 10% discount when purchased together? By using the special bundle item number, you’ll receive both products in the Nothing’s Better Than Bundle!
This warm, friendly bundle includes 26 photopolymer stamps with light-hearted greetings and tasty treats you can use to let your loved ones know they’re on your mind. Inspired by a Stampin’ Up! Million Sales Achiever, Connie Stewart, this cute ‘n’ clever set can be used to create a variety of fun projects! Use the chocolate-shaped stamp images to embellish a box of chocolates, the cookie dies to accent a container of cookies, and of course, the greeting stamps to add personality to a card. There’s no limit to what you can create with this bundle!

| SNOWFLAKE SPLENDOR SUITE |
Hello , |

| With forest-inspired imagery, the In the Pines Bundle helps you create easy projects with a woodsy, nature theme. While lending itself to Christmas projects, the In the Pines Stamp Set also includes a multi-occasion “Thinking of you” greeting. Use its timeless natural elements all year for masculine projects and more. The Two-Step Stampin’ images combined with the Pine Woods Dies to make this bundle a must-have for creating quick cards any day of the year. |

| BASIC We kept things simple on the first version of this cute card. A few simple layers, a splash of colour, ribbon, and a sentiment popped up using Stampin’ Dimensionals. This cheerful, little project takes just minutes to make and would be the perfect solution for a casual crafter workshop. |
| STEP UP Step up the charming second card by running the tag through the Stampin’ Cut & Emboss Machine using the Peek-A-Hoot Dies for a stitched-edge look. Fold the gold-trimmed satin ribbon in half, insert the ends through the hole in the tag, then pull them snugly through the loop at the end of the ribbon. We added a little extra pop to this card with a layer of Poinsettia Place Designer Series Paper, some Gold Glitter Enamel Dots, and heat embossing. |
| STEPPED-UP Our fanciest card is a real hoot. We embossed the card front using the Stampin’ Cut & Emboss Machine and the Evergreen Forest 3D Embossing Folder, adhered die-cut branches, and added a strip of Plush Poinsettia Specialty Paper. Perfect! |
| Whoo wouldn’t love to have a Christmas cardmaking party featuring these cute, outdoorsy cards? We certainly wood . . . er . . . would! |

Simple stamping is fun for everyone. Whether you’re brand new to papercrafting or you just want to stamp a greeting to add to a plate of cookies, we all need ideas for quick cards. |
| To make simple cards with a touch of pizzazz, use the “stamp-off” technique as we did here with the Love of Leaves Stamp Set. 1) Ink the stamp. 2) Stamp the image. 3) Re-stamp the image one or more times without re-inking it. This technique gives your card sophistication and depth without a lot of effort—and you get several shades of ink from one ink pad. Just add a bow and a sentiment and you’re done! |
| You can always add a touch of colour to a card using a simple Blender Pen trick. (We used the wheelbarrow image from the Autumn Goodness Stamp Set.) Stamp the image, then go over the stamped lines with the Blender Pen to colour in the wheelbarrow. So fun! Plus, you’ve added a touch of artistry that doesn’t require a lot of effort. |
We used the stunningly beautiful Autumn Greetings Stamp Set to create our final example—and to show you how stamped cardstock layers can add visual complexity without requiring a ton of work. Stamp one layer with a large stamp and adhere it to the card front. Then add a stamped tag—popped up with a Stampin’ Dimensional. It looks sophisticated, yet it’s easy to do. Simple stamping at its finest! |
Boho Indigo Scrapbooking Page


We all love gorgeous Designer Series Paper, and during this incredible sale, you can enjoy a 15% discount on select papers from our current catalogues! Now is a great time to stock up and save on some of our most popular paper designs!
Save 15% on 15 Designer Series Papers!
Plus, 8 of those discounted paper sets are from the August-December Mini Catalogue. Which means, now is the perfect time to stock up for all your holiday cards, projects, décor, and gift-giving. I'd love some Plaid Tidings in my stocking, wouldn't you?
Papers of all Kinds are on SALE!
No limits, but don't delay, because backorders could occur! Sale runs through October 31st only.
Today I'm sharing an elegant card tutorial featuring the Boho Indigo Product Medley. This gorgeous collection includes stamps, dies, paper, ribbon, die-cuts, and more! It's packed full of supplies that will inspire your creativity. In this tutorial, I used this card layout template today for inspiration as well you will also learn how to create a masked Embossing Paste background.

INSTRUCTIONS: |
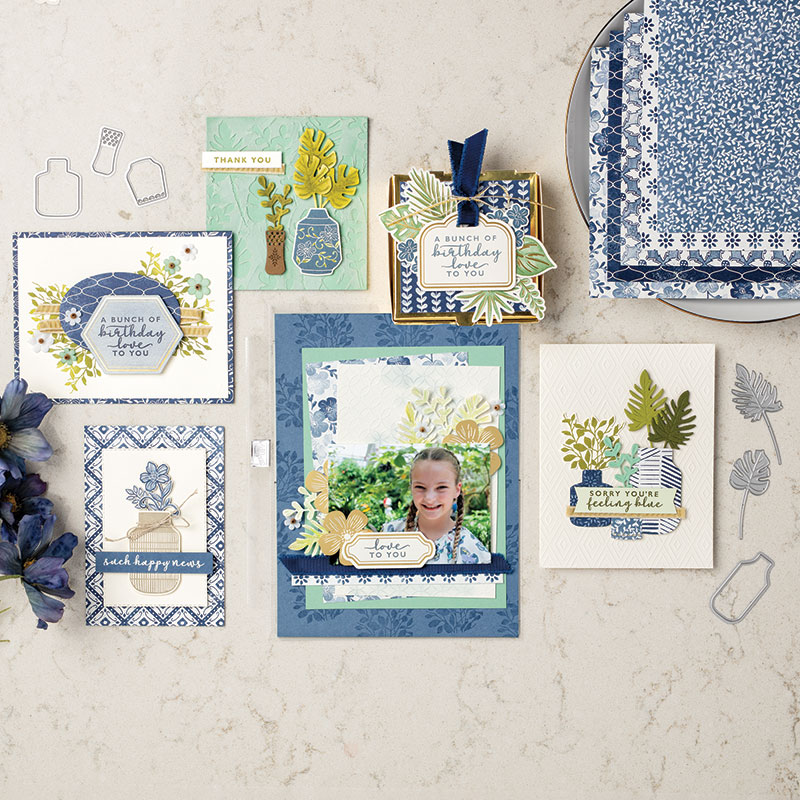
Boho Indigo Product Medley


")


 Cardstock")


")
")


