Today I'm sharing an elegant card tutorial featuring the Boho Indigo Product Medley. This gorgeous collection includes stamps, dies, paper, ribbon, die-cuts, and more! It's packed full of supplies that will inspire your creativity. In this tutorial, I used this card layout template today for inspiration as well you will also learn how to create a masked Embossing Paste background.

INSTRUCTIONS: |
2) Die-cut 3 of the rounded palm leaves and one small leafy branch from Very Vanilla cardstock.
3) Use Old Olive Stampin' Blends to colour the leaves. Colour the entire leaf with the light Old Olive Blend, then add detail with the dark Old Olive Blend. Use the light Old Olive Blend to blend the light and dark areas.
4) Die-cut at least 3 of each leaf pattern from scrap cardstock to use as masks. Add a small amount of Stampin' SEAL to the back of each leaf. Press the adhesive onto your fingers or scrap paper to make it a bit less sticky. The leaves will be used as masks so they are only being adhered temporarily.
5) Randomly place the die-cut leaves onto the card front.
6) Place a dollop of White Embossing Paste onto a Silicone Craft Sheet using one of the Palette Knives. Add a couple drops of Mint Macaron Ink Refill and mix with a Palette Knife to create coloured Embossing Paste. Make the paste as dark as you prefer by adding more ink drops.
7) Place your card with the mask leaves onto Grid Paper or scrap paper. Use a Palette Knife to spread the Embossing Paste over the entire card front. Smooth out the paste into a think layer that is the thickness of the leaf masks. Work fairly quickly as the Embossing Paste dries rapidly. Don't worry about perfection, having variations of thickness and texture looks best.
8) Once the entire card front is covered, and while the Embossing Paste is still wet, use the spatula or piercing tip of the Take Your Pick Tool to carefully lift the edge of a mask leaf and remove it from the card. Repeat to remove all the mask leaves.
9) Set aside the card to allow the Embossing Paste to dry and clean your Silicone Craft Sheet and Palette Knives right away. They are much harder to clean if the Embossing Paste dries on them.
10) Stamp the flower vase image from the Boho Indigo Medley on Very Vanilla cardstock with Misty Moonlight ink. Die-cut with coordinating vase die.
11) Use Old Olive Stampin' Blends to add a bit of colour to the leaf and vine portions of the stamped vase.
12) Stamp the small decorative vase image onto Soft Suede cardstock with Soft Suede ink. Centre the image in the vase die with the holes at the top.
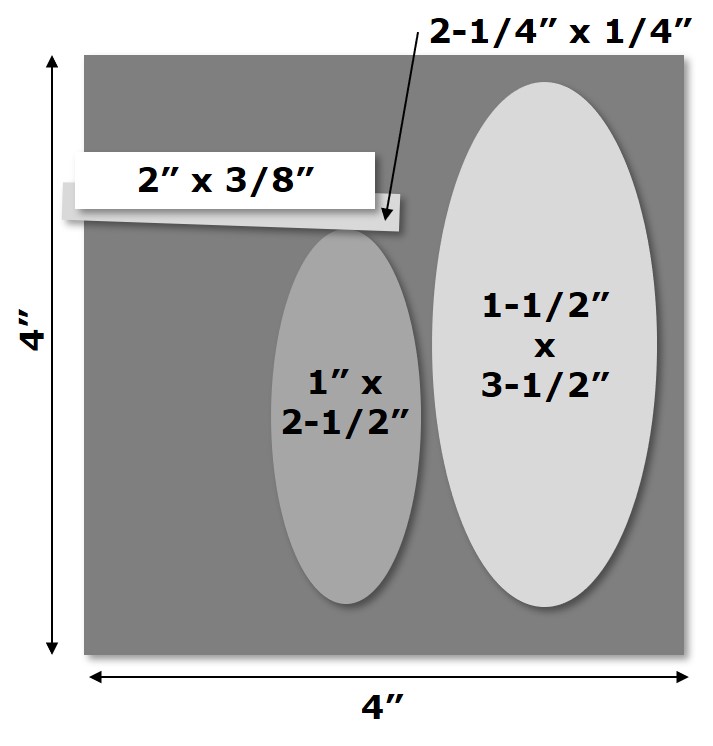
13) Stamp greeting on 2" x 3/8" Very Vanilla cardstock with Old Olive ink.
14) Once the Embossing Paste is dry on the card add the coloured leaves with Glue Dots and the vases with Stampin' Dimensionals.
15) Add a 2-1/4" piece of the gold ribbon from the Boho Indigo Medley near the top left of the card with Glue Dots or Stampin' SEAL+. Add the stamped greeting with Stampin' Dimensionals.

No comments :
Post a Comment
Thank you for making the time to write a comment ~ Have a great day